How often have you heard someone say “photography is easy, all you do is grab your phone and snap a quick picture!” Sure, with the rise of technology and easy access to cameras, it is indeed easy to “snap a quick picture.” However, would it be considered photography? When people go to the museums to observe works of great painters, they do not tend to compare their masterpieces with doodles they quickly sketched in their notebooks during a boring phone call. Was photography always taken for granted? And what is a true art of capturing a moment through the obscure vision of a lens?

Back in the early 1800s, when photography was only getting recognized by others, people considered it a miracle. Through camera obscura, the pioneers of the craft were able to capture people and busy streets of small European towns. The photography industry spent decades innovating and expanding its potential. And just like any other art medium it came up with sets of rules which defined the value of a photograph and helped in gaining respect and understanding of artists all around the world.
Just like any art medium, it looks complicated and scary for many artists who are hesitant in trying something new. Luckily, our creative team has gathered a couple of tips that would help you understand the craft of picture taking and will lean you towards improving your skills on this wonderful journey.
Tip 1: Lighting
The word “photography” comes from (phōtós), which means “light”, and (graphe), meaning “drawing”, meaning that picture taking crucially relies on the understanding of lighting.

A proper lighting defines the mood, atmosphere and tone of the artwork, making the subject pop out of the frame and therefore creates a three-dimensional space, in which it becomes more interesting and attractive to the viewer. It also helps in making the quality of the final product higher and interactive. There are different variations of lighting setups, such as flat light (a main source that lights up the front of the subject), broad light (a side lighting), slight lighting ( a way to separate a half of the subject by making one side of it darker and another lit up), short light, rim lights and hundreds of other techniques that define the overall presentation of your final picture.
As a beginner, there is no need to worry about getting expensive equipment. You can always try and play with natural lighting first. Best time for an outside photoshoot usually takes place around an hour before the sunset. This time period is called “Golden Hour” and it's an amazing opportunity for amateur artists to grab their cameras and observe the way the sunlight sets on their subject. As an inexpensive piece of equipment you can try and use “bounce boards.” It is essentially a large white cardboard that reflects and softens the light, making the overall appeal more sensual and subtle.
Tip 2: The rule of thirds
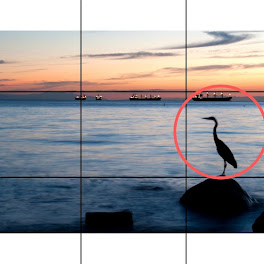
Imagine a grid, dividing your photograph in 9 equal squares. Your goal is to position the subject in either left or ride third of an image. Avoid having your ‘model' pose right in front of the camera, as it cheapens the work and lacks navigation, meaning the viewer will be confused where to look at. However, placing an “attention grabber” on the side of the frame gives more room to fully grasp the idea of the image. You get to create a “pleasing” take on the final work and emphasize on the importance of the subject you capture. The rule of thirds is all about composing the subject in the most engaging way possible.
Tip 3: Tell a story

Even the most fabulous, professionally made photo could be considered boring and anticlimactic. Make your audience feel something special! Prior to turning your camera on, think about what would your picture contribute or share with others? How is it different from what people already have seen? What is unique about it? Photography is a form of artistic storytelling, therefore, if your work does not carry a message or meaning behind the lens, it would not be considered as “art”, but rather a technical execution of a meaningless task.
Tip 5: Post-process
Once your photoshoot comes to its end, it's time to use some “magic” in a post-production suit. Digital editing is not mandatory, but highly recommended! You do not need to buy expensive softwares, such as Photoshop, that tends to intimidate a lot of beginners. Nowadays, the majority of smartphones and laptops have an editing feature already in the device, that you do not need to download or search for. The simplest layout will be guaranteed to have what you need! Spend 5-10 minutes correcting your exposure, playing with colours and shades and with those final touch-ups your work will look much more professional and unique.
Tip 6: Delivery
You have spent so much time and effort making a good photograph. Don’t let it collect dust or hide in the shadow of unopened emails and files on your computer. Take the next step and present your work to others! As a beginner photographer it is amazingly rewarding to see your first work in a professional appearance. We offer prints on high-quality canvases and other materials, used by many talented individuals in their art spaces, such as exhibits or art galleries. With our guarantee to provide an outstanding service in printing your work and your dedication to a new craft, you will be able to develop as a professional, and maybe one day evolve your hobby into a real life-long creative career!

And there you have it! After going through the cycle of photography, from brainstorming the idea to a delivery stage, you will never take this artistic field for granted and will be able to train your mind to see the beauty, hidden from others.
If you found this article interesting, you may also enjoy reading additional information and exciting insights on our website!
Click here to explore more photography related articles.
No comments:
Post a Comment